Почему стоит использовать WebP для 1С-Битрикс?
Использование Webp решает проблему "Используйте современные форматы изображений" в Google Pagespeed Insights.
Если вкратце, то WebP сжимает файл лучше при прочих равных, чем более старые форматы (png и jpeg) - а значит занимает на хостинге меньше места и быстрее загружается в браузере при просмотре страницы.
Внедрение WebP активно пропагандируется Google-ом - они предоставляют такую статистику:
- WebP сжимает изображения без потерь на 26% лучше, чем PNG.
- WebP сжимает изображения с потерями лучше, чем JPEG на 25-34% при одинаковом индексе структурного сходства (SSIM)
- WebP поддерживает прозрачность без потерь (известную, как альфа-канал) при увеличении размера всего лишь на 22%.
Если браузер посетителя не поддерживает WebP, то CDN отдаст старый формат (png/jpeg), но сжатый (оптимизированный под Web)
Что такое сжатие изображений
Оптимизация картинок является специальной обработкой графического файла с целью минимизировать его размер без потери визуального качества.
Чтобы провести данную процедуру, есть большое количество достаточно сложных алгоритмов. Однако, все они базируются на одной основе — из графического файла нужно удалить все находящиеся там служебные данные (например название программы, которая хранит данный файл и др), а также, при помощи специальных программ соединить/сгладить похожие цвета.
В результате мы получаем то же изображение, которое визуально никак не изменилось. Однако, объем (вес) этого файла в байтах будет гораздо меньше, чем оригинал. Если провести данную обработку правильно, файл с изображением можно уменьшить до 98%, не теряя при этом качества изображения.
Это значит, что картинки на страницах сайта будут загружаться в разы быстрее после проведения их оптимизации.
Что даст оптимизации изображений для вашего сайта
- Экономия места на диске.
- Ускорение загрузки страниц.
- Минимальная нагрузка на сервер.
- Увеличение конверсии.
- Более качественное ранжирование сайта при поисковой выдаче.
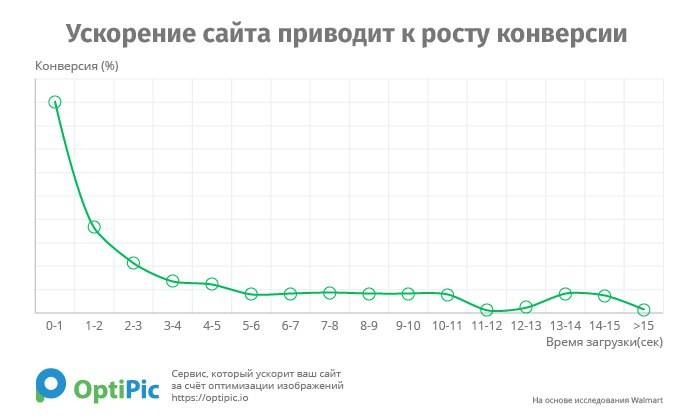
Доказано, что ускорение сайта способно улучшить поведенческие факторы, а также поднять конверсию сайта (увеличить продажи). Чем дольше будет загружаться страница сайта, тем меньше покупателей сможет совершить там определенные целевые действия. Если Ваш сайт в Интернете будет работать не достаточно быстро, у Вас есть все шансы упустить свой потенциальный доход. Ускорение работы интернет-ресурса даст возможность улучшить конверсию и благодаря этому значительно увеличить выручку и привлечь больше клиентов.

Преимущества сервиса CDN OptiPic
- Отсутствуют ежемесячные платежи.
- Полная автоматизация.
- Предоставление бесплатной помощи при подключении.
- Для подключения и использования сервиса не нужно иметь специальных навыков в программировании или администрировании.
- В системе отсутствуют ограничения на размер изображений.
- Техподдержка на русском языке.
Каким образом оптимизация изображений может ускорить сайт?
Страница любого сайта чаще всего состоит из:
- изображений;
- html-кода (текстовое содержание, верстка, разметка);
- видео;
- javascript-скриптов с логикой, выполняющихся со стороны браузера;
- файлов-css со стилями страницы.
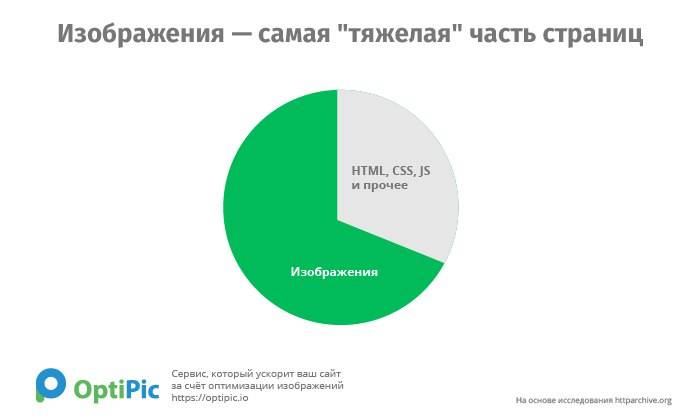
Такой пункт как изображения, занимает на страницах сайта большую часть всего объема и является самой «тяжелой» частью страниц.
Уменьшение (оптимизация) изображений бесспорно позволит существенно сделать более быстрой загрузку любого интернет-ресурса.

Соответственно, если изменить (в меньшую сторону) объем изображений, все страницы сайта начнут грузиться значительно быстрее.
Сжатие картинок на сайте даст возможность уменьшить их объем до 75-98%, не теряя при этом свое визуальное качество.
При загрузке изображений на компьютер пользователи все чаще сталкиваются с новым форматом WebP. Это формат изображения от Google, который позволяет веб-мастерам загружать качественные и компактные изображения на сайт. Вы также можете просматривать их на ноутбуке или смартфоне, а не только в браузере.
Что такое формат WebP и каковы его преимущества?
Изображения, размещенные на сайте, весят намного больше, чем текст. Они замедляют загрузку сайта, требуют постоянного увеличения затрат на хостинг. Поэтому владельцы сайтов вынуждены искать компромисс между качеством и емкостью.
Классический JPEG не всегда достигает желаемого результата. Особенно если вам нужна хорошая графика маленького размера. Поэтому многие владельцы сайтов используют в качестве альтернативы PNG, которая обеспечивает высококачественное изображение. Но формат весит намного больше. Поэтому сайт трудно.
Новое развитие Битрикс WebP обеспечивает лучшее сочетание размера файла и качества. Компромисс между объемом и результатом практически незаметен. Формат был разработан более 10 лет назад. За это время он был хорошо протестирован на многих сервисах Google. Его можно смело рекомендовать владельцам сайтов. Битрикс PageSpeed Insights настоятельно рекомендует использовать WebP на сайтах вместо устаревших форматов изображений (PNG/JPEG), чтобы ускорить загрузку сайта.
Но с этим форматом, как и с любым другим, особенно новым, могут возникнуть проблемы при использовании менее распространенных браузеров. Чтобы изображения отображались корректно, необходимо убедиться, что они отображаются в обычных тяжелых форматах в таких случаях. Кросс-браузерная совместимость достигается двумя способами. Введением определенных алгоритмов в код, когда владельцам универсальных браузеров, включая все последние функции и разработки, показывается полностью функциональная версия сайта, а владельцам редких браузеров или устаревших версий известных - упрощенная версия. Или с помощью специальных плагинов, которые позволяют делать все через интерфейс, понятный обычному пользователю.
На первый взгляд такой подход кажется неэффективным. Но это впечатление обманчиво. Потому что те, кто отказываются от улучшения ресурса, от использования новых удобных решений, неизбежно проигрывают в конкурентной гонке. Прогрессивное улучшение, даже если нужно временно поддерживать два формата, окупается.
Как конвертировать файлы в WebP Битрикс
Формально, конвертирование старых форматов PNG/JPEG в WebP легко. Для этого было создано много утилит. Но как конвертировать все изображения уже созданного сайта? Это проблема, с которой сталкиваются большинство владельцев сайтов. Поскольку оптимизация изображений Битрикс вручную - это крайне трудоемкая задача.
Чаще всего для сжатия изображений Битрикс, преобразования PNG/JPEG в WebP используются специальные утилиты. Программы, которые позволяют выполнить эту трудоемкую работу в несколько кликов мыши. Функциональность различных плагинов не одинакова. Некоторые предлагают простую переделку, а другие сохраняют старые форматы, необходимые для пользователей с более старыми браузерами.
Эффективность плагинов также не одинакова. Хорошие делают конвертацию быстро и без проблем. Поскольку он тщательно протестирован разработчиками. Другие, обычно бесплатные и очень дешевые, часто дают ошибки из-за проблем совместимости с версией платформы или другими приложениями.
Один из лучших - OptiPic CDN. Сервис автоматизирует сжатие изображений Битрикс, позволяя установить готовый интеграционный модуль для этой CMS на сайте. Именно он чаще всего используется при оптимизации для PageSpeed, поскольку OptiPic CDN не только конвертирует и обеспечивает прогрессивное улучшение, но и снимает нагрузку с хостинга сайта, ускоряя возврат изображений за счет дополнительного кэширования и оптимизации.
Автоматизируйте конвертацию в WebP Битрикс с помощью OptiPic
Чтобы ускорить Битрикс с помощью сервиса OptiPic CDN, вам нужно загрузить и установить плагин для Битрикс на свой сайт, используя видеоинструкцию, расположенную на главной странице сервиса. Процесс установки прост и обычно не вызывает трудностей даже у начинающих. Любой пользователь может справиться с задачей.
Как работает оптимизация изображений Битрикс
- Плагин преобразует и доставляет файлы WebP пользователям, если браузер поддерживает этот формат.
- Возвращает сжатую версию изображения в старом формате (без конвертации), если автоматическое тестирование показало, что браузер пользователя не поддерживает WebP Битрикс.
- При просмотре сайта с мобильного устройства приложение адаптирует изображения к узким экранам телефонов.
- Выполняет кэширование для ускоренной загрузки изображений, чтобы сайт работал быстрее и загружал хостинг меньше.
- Вы можете использовать сервис на платной и бесплатной основе. Испытательный тариф дает 100 000 показов, что достаточно для оценки удобства сервиса, чтобы понять, как он вам подходит. Бесплатные показы начисляются сразу после регистрации.
Каковы преимущества формата WebP?
WebP - это формат изображения, разработанный Google, который предлагает несколько преимуществ, включая:
- Меньший размер файла: изображения WebP обычно на 25-34% меньше по размеру по сравнению с изображениями JPEG и PNG того же качества. Это означает более быстрые времена загрузки и снижение использования полосы пропускания.
- Улучшенное качество изображения: WebP использует передовые методы сжатия, которые сохраняют качество изображения, снижая размер файла. Это означает, что изображения выглядят лучше, чем изображения JPEG или PNG того же размера.
- Поддержка прозрачности: WebP поддерживает как потерянную, так и без потерь прозрачность, что делает его универсальным форматом для изображений с прозрачными фонами.
- Широкая поддержка браузеров: WebP поддерживается большинством современных браузеров, включая Google Chrome, Firefox и Microsoft Edge. Он также может быть легко преобразован в другие форматы изображений для совместимости с более старыми браузерами.
Почему Google выпустил WebP в качестве открытого исходного кода?
Google выпустил WebP в качестве открытого исходного кода, чтобы предоставить более эффективный и быстрый формат изображения для веба. WebP использует передовые методы сжатия для уменьшения размера файлов изображений без ущерба для качества. Это приводит к более быстрым временам загрузки для веб-сайтов и лучшему пользовательскому опыту для посетителей. Сделав WebP открытым исходным кодом, Google также поощряет разработчиков внести свой вклад в проект и улучшить формат со временем.
Поддерживает ли WebP постепенное или интерлейсное отображение?
Да, WebP поддерживает как постепенное, так и интерлейсное отображение. Постепенное отображение загружает изображение в несколько проходов, позволяя быстро отобразить низкоразрешенную версию изображения, пока загружается версия более высокого разрешения. Интерлейсное отображение загружает изображение в ряд горизонтальных линий, позволяя быстро отобразить грубую версию изображения, пока детали загружаются в фоне.
Без потерь WebP
Без потерь WebP - это тип формата изображения, который использует технологию WebP для сжатия изображений без потери данных или качества. Это означает, что изображение может быть сжато до меньшего размера без потери деталей, что делает его более эффективным форматом для хранения и обмена изображениями в Интернете. Без потерь WebP особенно полезен для изображений, которые требуют высокого уровня детализации, таких как фотографии или графика с текстом. Он также совместим со многими веб-браузерами и может быть легко интегрирован в существующие веб-сайты и приложения.
С потерями WebP
С потерями WebP - это тип формата изображения, который использует методы сжатия с потерями для уменьшения размера файла изображения. Сжатие с потерями работает за счет отбрасывания некоторых данных изображения, что может привести к уменьшению качества изображения. Однако компромисс заключается в том, что размер файла получается меньше, что делает его более легким и быстрым для загрузки в Интернете. С потерями WebP часто используется для изображений, которые не требуют высокого уровня детализации или четкости, таких как миниатюры или фоновые изображения.
Почему WebP (с потерями) лучше, чем JPEG
WebP превосходит JPEG благодаря кодированию предсказаний, адаптивной квантовой фильтрации и булевой арифметической кодировке. Последнее обеспечивает улучшение сжатия на 5-10% по сравнению с кодированием Хаффмана.
Купленный пакет не сгорает в конце месяца - выгодно приобретать на несколько месяцев вперед


 OkayCMS
  Laravel
  TomatoCart
  DIAFAN.CMS
  osCommerce
  Simpla